Setting up and Configuring a Small Office or a Home Network, Remotely Controlling Networked Computers and File and Print Sharing
This is a short tutorial on configuring a Home or a Small Office Network
using CAT-5 Cables and a standard Network Switch. It also briefly explains how the admininistrator can monitor and whenever necessary remotely control the computers in the network.
Many times one must have thought that despite having more than one PC one cannot
take advantage and share the recources like printer, present on one of the computers among all the
computers . In the absence of a network we have to copy the files on a USB flash drive and get them printed on the PC where the printer is connected .
Besides the printer you may have a very small hard disk on one of the computer and more than 250GB of free space on the most recent PC.
The situation is similar in case of DVD writers etc. connected to one of the computers.
Another advantage of having a network is that we can also share an Internet connection between all the computers in the network.
Introduction to LAN, Hub and Ethernet (or Network) Switch
Now all your problems can be solved if you connect all the Computers in a network. Such a network
of a few Computers connected together is known as local area network (LAN) .To connect two or more
Computers in a network we require a network card for each PC, CAT-5 Cable of suitable length,
RJ–45 connectors [two for each PC].
A Network Switch (or Hub) is required If we wish to connect three Computers or more.
If we have to connect only two Computers then we do not require a Network Switch (or Hub). We can
cross crimp one of the connectors. Presently a network interface card [NIC Or LAN card] costs below Rs 500. Eight port Network Switch costs less than
Rs 1,000, CAT–5 Cable [Rs 8 approximately per meter].
A hub enables transmission of data between a single pair of points in the network.
For simultaneous Transmission of data between more than one pair of points we have to use a Ethernet Switch.
Setting the TCP/IP Addresses For Each PC in the Network
We will now take a look at how to set up a small network for the purpose of Sharing printers and
other peripherals and files between the Computers in the network.
First of all we have to fit a LAN card in each of the Computers that we want to
Connect to the network. For computers bought within the last two or three years this step will not be necessary as a built in ethernet facility will be available on the
motherboard and we can straightaway move to configuring it once we have the switch and the cables in place.
We have to check if there is a free PCI slot available. After installing the LAN card in the PC and restarting you will be prompted for the drivers.
Upon inserting The CD–ROM containing the drivers and installing the drivers, you will be prompted to restart the PC. Once the PC has rebooted you
will have to set up the TCP/IP network protocols. 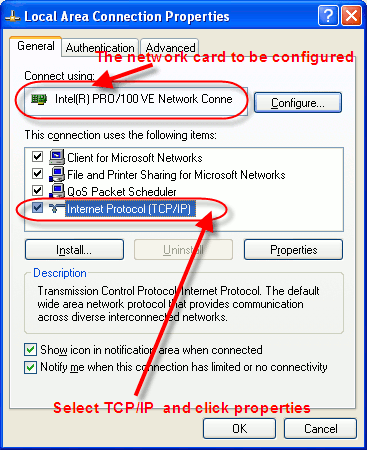
Besides the necessary protocols the have also to install the file and printer sharing client for Microsoft networks.
The configuration consists of setting up unique IP addresses for each PC. We have to click on the Start button and go the control panel. From there click on Network connections.
Right Click on Local Area Connections and select Properties.
Click on Internet Protocol(TCP/IP) and then click on Properties. The internet protocol TCP/IP properties will be displayed.
Here enter the settings
Select Use the following IP address and then enter
IP Address: 192.168.1.x where x can be any number from 2 to 255
Subnet mask: 255.255.255.0
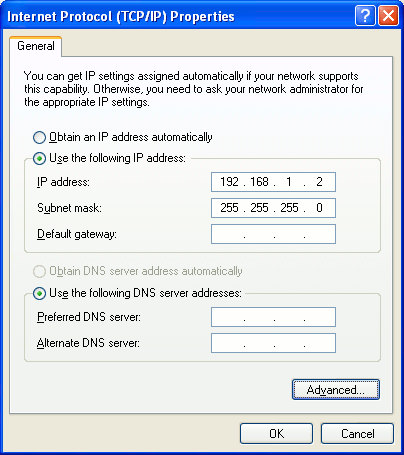
Similarly configure the other Computers in the network increasing x by one in the IP Address.
For connecting two PCs a switch or a hub is not required and a simple cross connected cable can be used for interconnection.
The details for preparaing such a cable are given below
CAT-5 Cable Color Codes And Connection Details
The color codes of Cat–5 cable Are as follows .
| Connector Pin No | Color Code |
| 1 | White/Orange |
| 2 | Orange |
| 3 | White/Green |
| 4 | Blue |
| 5 | White/Blue |
| 6 | Green |
| 7 | White/Brown |
| 8 | Brown |
For Normal Connection:.
All the wires a connected in order
i.e. One to one, two to two, three to three, four to four etc.
For Cross Connection:
The wires to swap are One and three, Two and six
Sharing Printers on the Network
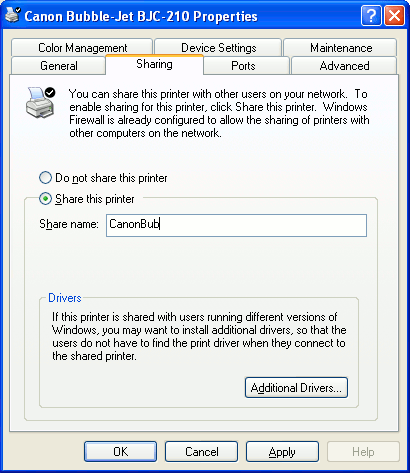
To enable prineter sharing Go to Start > Printers and Faxes. Right click on the printer of your choice and select properties.
Then select sharing from the next screen and click Share this printer.
Sharing Folders on the Network
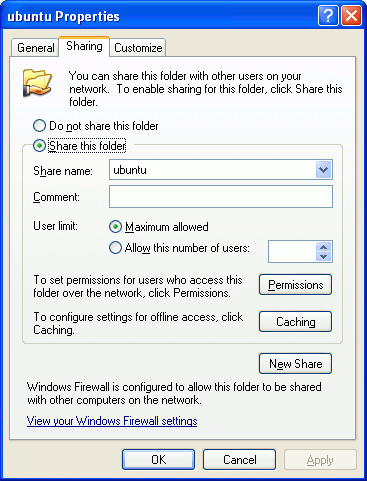
For sharing any folder, right click the folder that you want to share and click properties.
Then on the sharing tab click on Share this folder on the network.
To enable secure file sharing go to the Control Panel. Then double-click Folder Options.
Click on the View tab and then clear Use Simple File Sharing.
Now on each shared folder, the Sharing tab under properties will contain a
permissions button where you can set permissions for the various users and groups.
Allocating TCP/ IP addresses
A network with 254 or less computers called a class C network. The IP address series used is 192. 168.1. X where x is a number from 1 to 254
The numbers 0 and 255 are reserved for special TC/IP functions.
The number 1 is normally assigned to a router device that connects local area networks
to the Internet. This was discussed earlier in the tutorial to configure the BSNL broadband connection.
For the first computer in the network set the IP address To 192. 168. 1. 2 and the subnet mask to 255.255.255.0
For subsequent computers increase the last digit of the IP address quartet by one, keeping the subnet mask constant.
That is Assign IP addresses numbered like this
192.168.1.2
192.168.1.3
192.168.1.4
Remote Control Computers in a Network
If you do not wish to enable administrative privileges for the users on their PCs, you can create normal user accounts
on the users PC and keep the administrative privileges with the network administrator. For this purpose you can install TightVNC on both the machines.
This will enable the admininistrator to monitor and whenever necessary remotely control the other machine on the network.
Tight VNC server will have to be installed on the machine that you wish to
control whereas Tight VNC Viewer will have to be installed on the administrators machine.
A similar system can be used to control machines that are connected to the internet. In this case we have to install Hamachi in all the machines
that are to be a part of the network to set up a Virtual Private Network (VPN) and then proceed as above.
Instant Messaging on the Local Network
Several IP based chat systems like Interchat can be used to implement messaging over the local network.
A Web Based Knowledge Base on Your Local Network
If your network is of 100 computers or more, you can consider setting up an apache web server and a content management system like Joomla or Drupal
These will enable all the computers on the local network to have access to a knowledge base.
You can also have A document management system with tight control on who has access to which document.
There are also a lot of other web based applications that can be installed and configured like Human Resource Management.