
ECommerce Website Development Using WooCommerce and Free Astra Theme
By: Joseph de Souza
WordPress and WooCommerce Installation
First of all, we have to install WordPress followed by WooCommerce. Next we proceed to setting up our Ecommerce store.
In the first screen, you will get a welcome screen which reads "Welcome to Woo". Click the button "set up my store".
Next you will be asked to select between three options. I'm just starting my business, I am already selling, I am setting up a store for a client. You can select one of these and click continue. Next, under tell us a bit about your store on the following page, enter the name of your store, select an industry , select the country and enter your email address.
Proceed to the next screen where a full page with optional items will be displayed, just unselect them and continue. Then the next screen will be displayed. You will have to add your products, set up payments, customise your store and a few other things. You can then go to the set up screen and configure your store.
There are various steps on the top namely General, Products, Shipping Payments, Accounts and Privacy, Emails, Integration, Site, Visibility, Point Of Sale and Advanced.
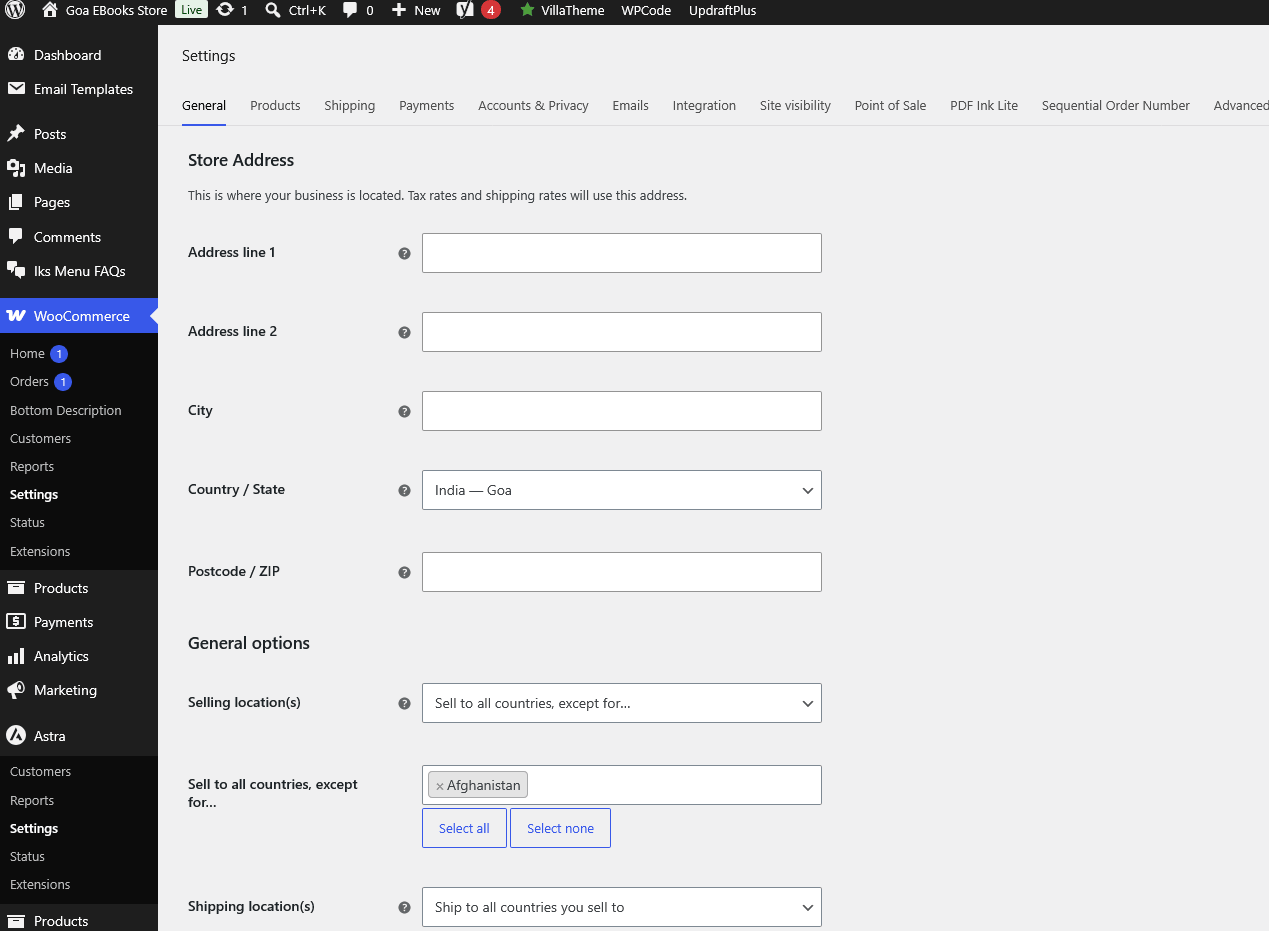
Step 1: WooCommerce Settings - General, Products
Now we will turn our attention to the settings. The first step General. Here we enter the store address, city, country, postcode and general options. We can specify the selling locations and the shipping locations. We can also enable or disable taxes and coupon codes. Under the currency options, we can specify the default currency, the currency position, thousand separator etc.
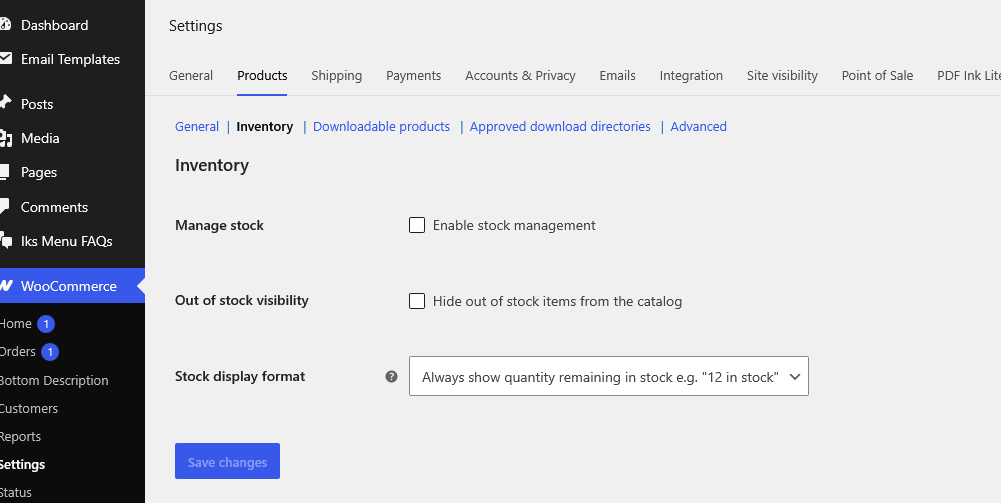
Various options regarding the products can be specified under the products tab, including the default shop page, Placeholder image, etc..
The next sub Tab is inventory, we can enable stock management if you want the shop to manage the stock as well. Now for a store which does not sell any physical products, we have to disable stock management.
All the stock related notifications for a store which ships physical products and if you have set the store to manage inventory will be available for you here. In case stock management is enabled and we do not want orders to get auto cancelled. We have to keep Hold stock (minutes) blank.
If you do not want the store to manage the stock. We can just disable it.
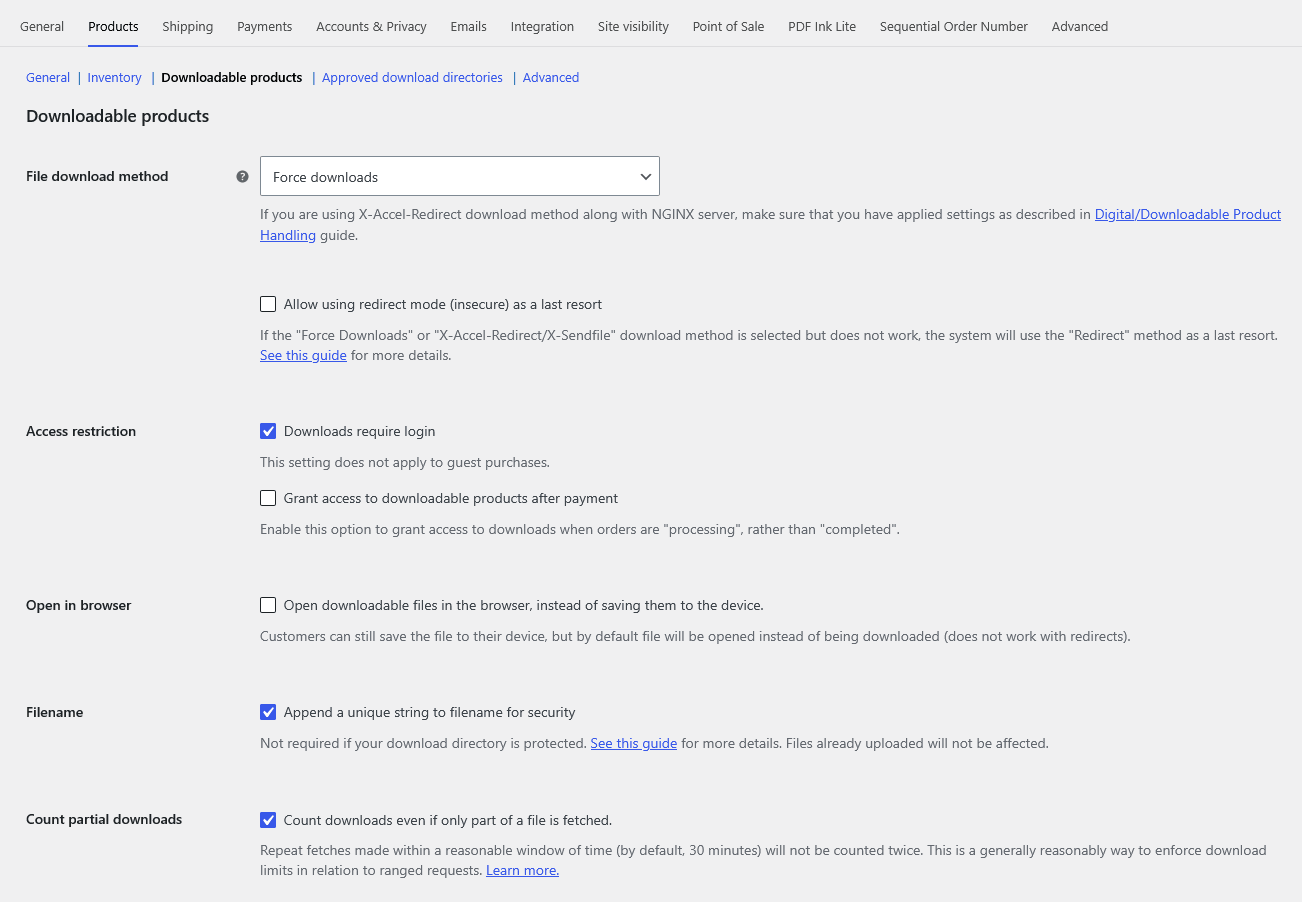
Step 2: WooCommerce Settings - Digital and Downloadable Products Like Ebooks
Next the downloadable products tab. We have to use the file download method as “Force downloads”. This will provide security to the downloads. In addition, we can have an access restriction for downloads by enabling “Downloads require login” to force the customer to login when the customer wants to download the purchased items. under file name, append a unique string to file name for security.
Under approved download directories. You have to enter the directories which is actually a physical directory in the web hosting The physical directory means the directory has to exist on hosting and the second directory, which is shown is the absolute directory which has domain name specified. For Example we have the following url as an example:
https://www.myebookstore.com/wp-content/uploads/woocommerce_uploads/ .
Under Advanced, we can set up some advanced options. For the time being we will just keep it as default.
Step 3: Setting up the Shipping Zones and Shipping Methods (For Physical Products)
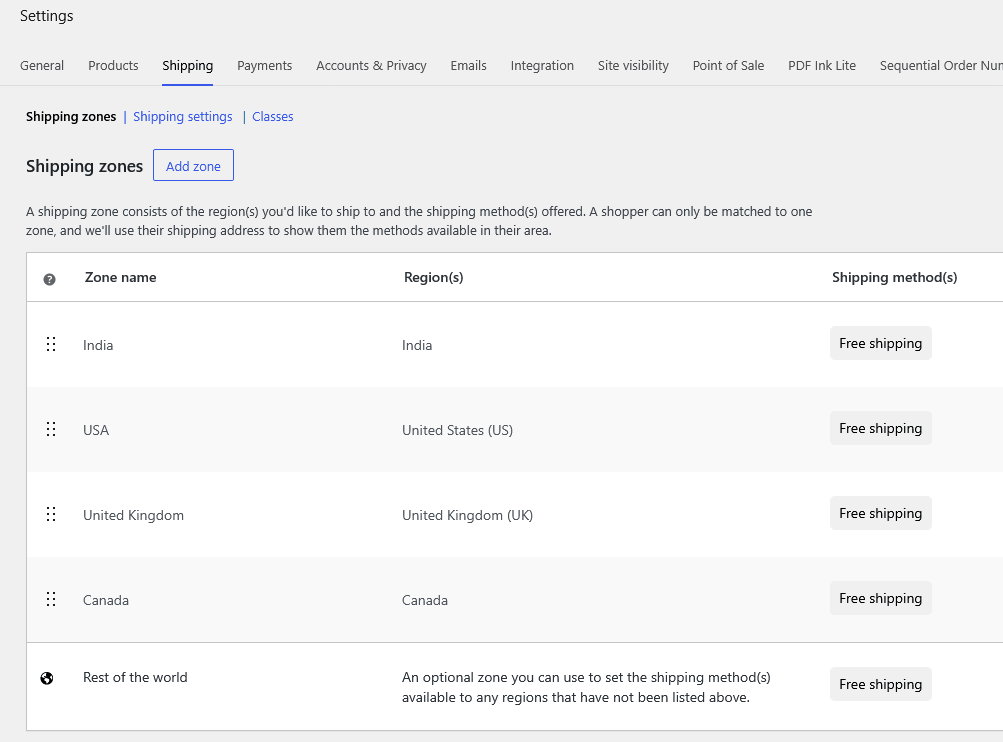
Under Shipping, when we sell physical products we have to create Shipping zones and then create shipping options for each zone. This will enable us to have different shipping rates and shipping methods for the different zones that we have created. A zone may consist of a single country, a group of countries or certain regions within a country.
Zones will also help us in specifying different tax rates, shipping methods and shipping charges for each zone.
Step 4: Setting up the Payment Gateways and Customer Account Options
Under payments we can set up the various payment options, including off-line payment options. Any custom payment gateway plugin that we have installed will also appear here.
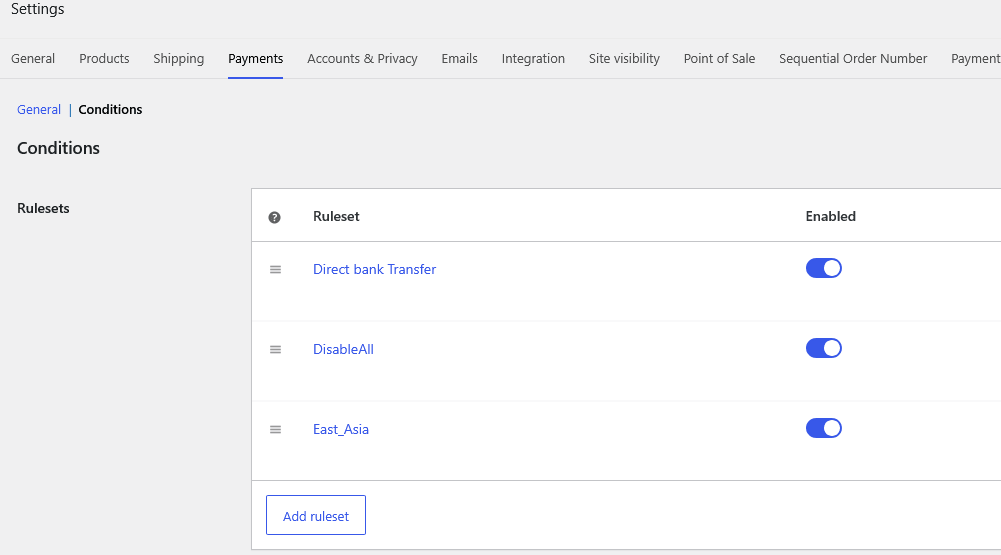
We can also restrict payment options to certain countries by means of a plugin like Conditional Payments for WooCommerce
Under Accounts & Privacy , few additional options are given to us.
We can allow customers to create an account during checkout or on the "My account" page. We can also customise the account creation options by sending a “Send password setup link” or generate an account login.
Step 1: WooCommerce - Automated Emails
Next we look at automated emails sent from the WooCommerce store. We can enable the email notification that are sent from our ecommerce store under certain conditions. In case we have a specialised email customisation plug-in like Mailonix - Email Template Customizer for WooCommerce , a brief preview of the email will appear at the end of this tab. 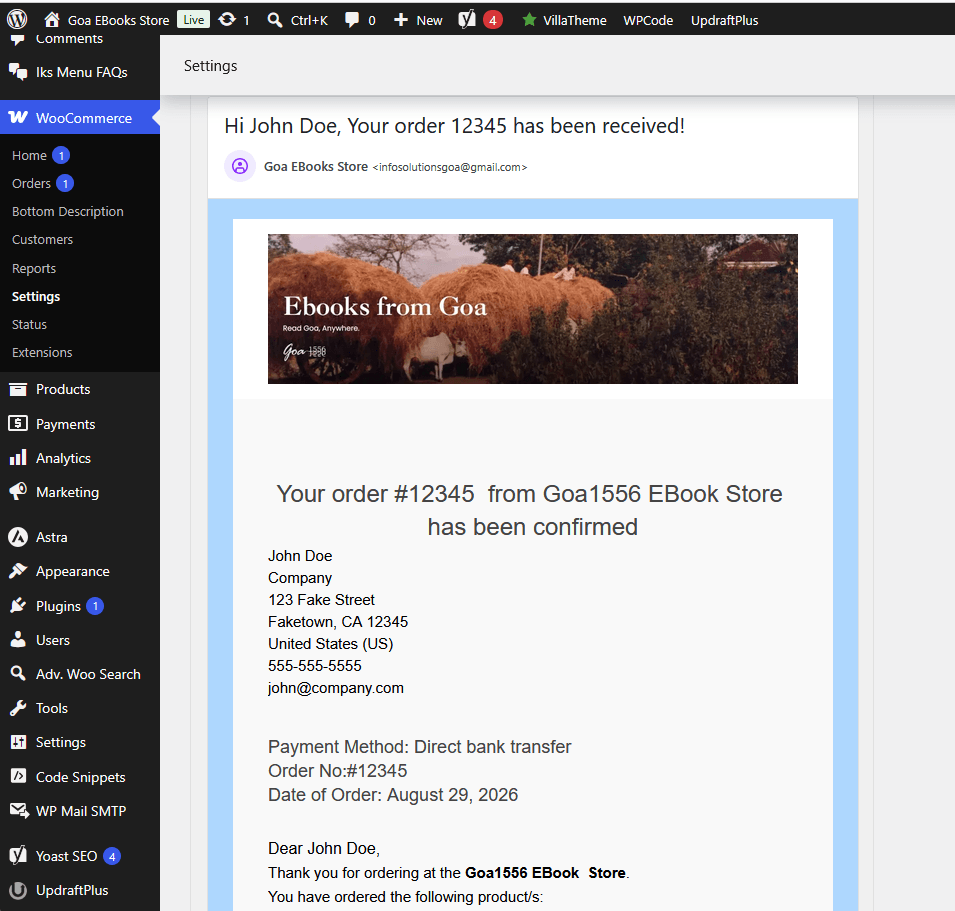
Under site visibility, we can choose between the store being live or coming soon. In coming soon mode, the store is displayed only to the administrator. Under point of sale, we can add the physical address of the store, if it exists.
There are various other tabs that may be displayed, in case you have installed additional plug-in like sequential order Numbers, or PDF Ink Lite if you want to watermark the PDF EBooks, which you are offering for download.
In a virtual store, which has the PDF Ink Lite plugin installed the watermarking plug-in settings can be accessed by clicking on that tab.
Step 1: WooCommerce - Advanced Tab
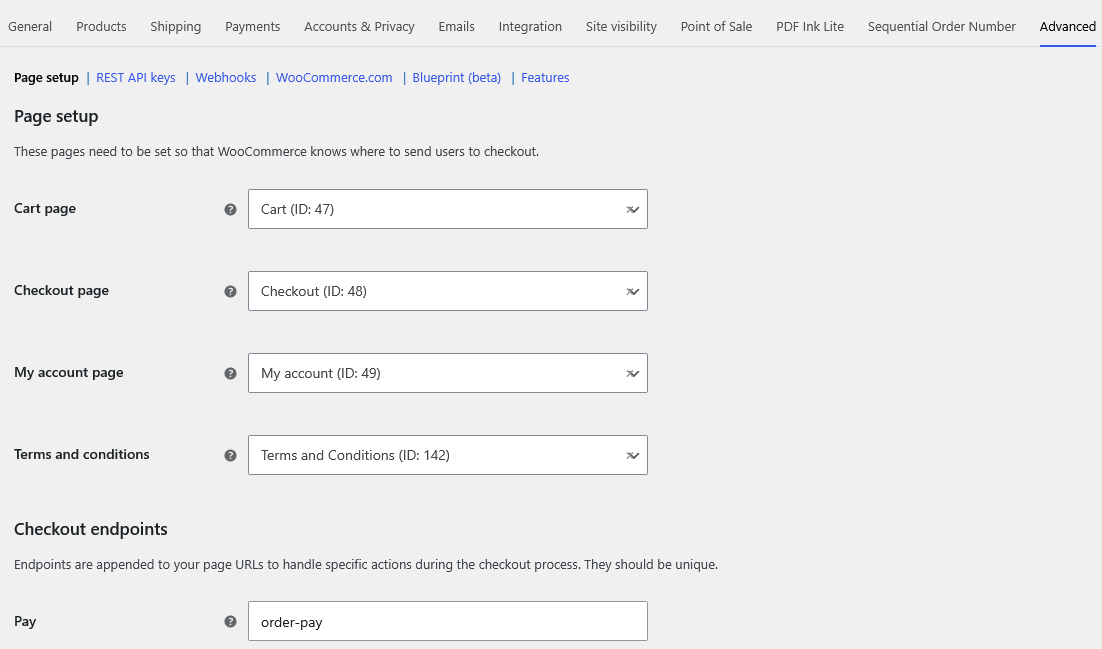
At the Advanced tab we have to set up the pages so that WooCommerce knows where to send users to checkout.
For example, cart page, checkout page, my account page, terms and conditions page. All these pages can be set up here. Also, the account end points. For example orders, View orders, downloads, Edit account, Addresses, etc.. This is in brief the various settings that we have to set up in a new store.
Permalink for Products in Woocommerce
To have a custom Permalink for a Product page in WooCommerce we have to enter the custom base like /product/. This can be done by going to Settings >> Permanlink from the administrator dashboard. 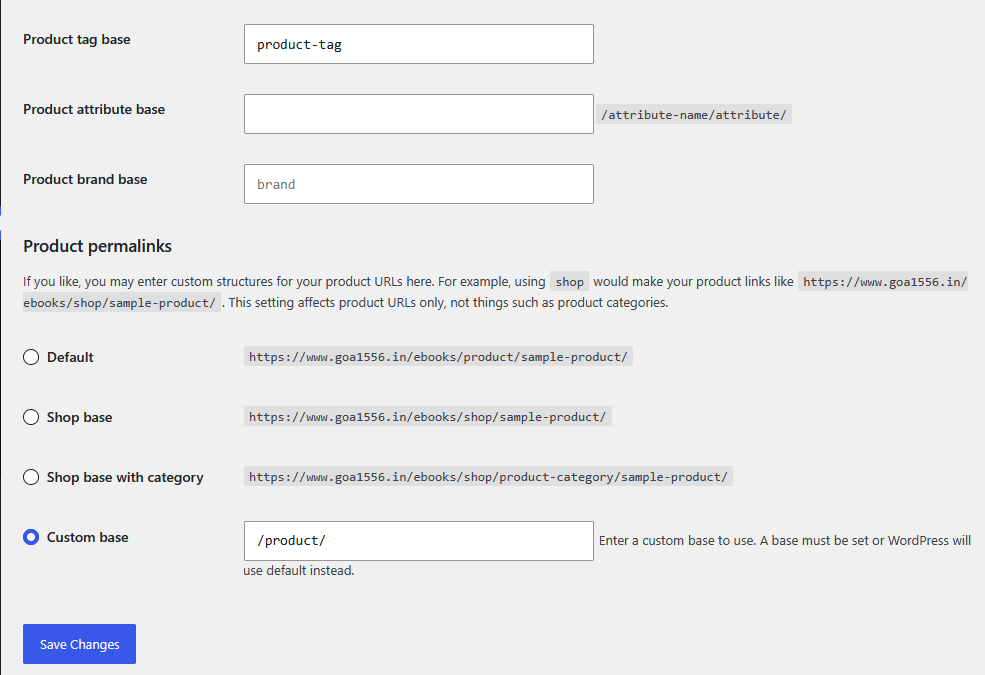
For Adding Search in Menu
Create a search page. Enter the heading and just the shortcode for Advanced Woo Search
i.e.
[aws_search_form]
Customisation of the Astra Template for WooCommerce Based E-Commerce Website
Next, we have to turn our attention to template customisation. For this store, we have installed the Astra free template. First we shall customise the template.
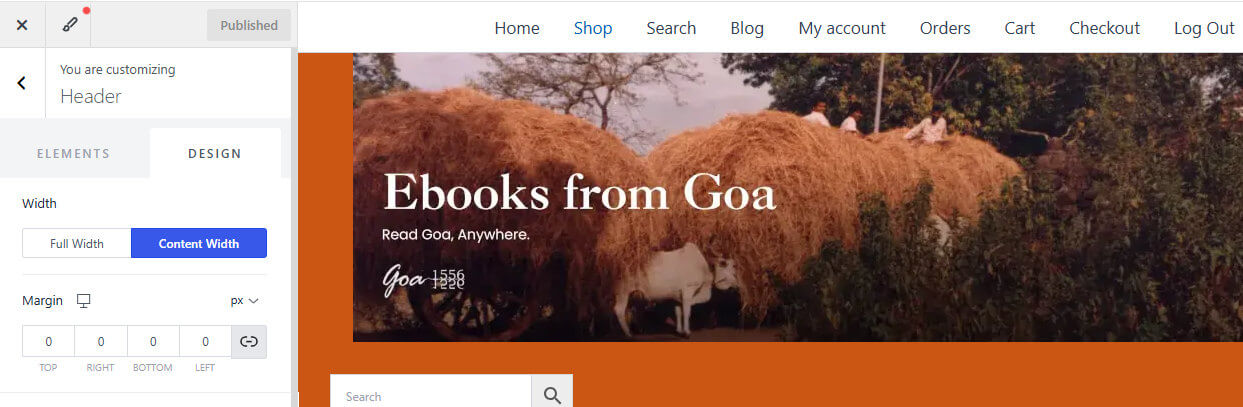
At the outset, I would like to mention that we can have two types of headers - logo only header or header that sits right above content and extends the full width of our content. If you wish to have a header on top of the content that extends the full width of the content, we have to have a header that is about 1024 pixels in width and about 300 pixels in height. This is in fact set after determining the resolution of the majority of projected visitors.
In case you want a width of 1920 pixels , you can opt for it and your header can be uploaded. You can also upload a header double of that and then scale it down by using custom css in the html widget that is used in the Primary Header.
We have to accordingly set the width for our boxed settings in the template customiser section. When we design this header in the graphic editor, keep it at two to four times greater in resolution as compared to the final width and height.
We can customise this by going to Astra >> customise
We have various options displayed on the screen that appears next on the left side of the page. The first one is called global. Here we can set the typography, colours and buttons. Under typography, you can set fonts and font sizes for various elements in the page like headers, paragraph etc.
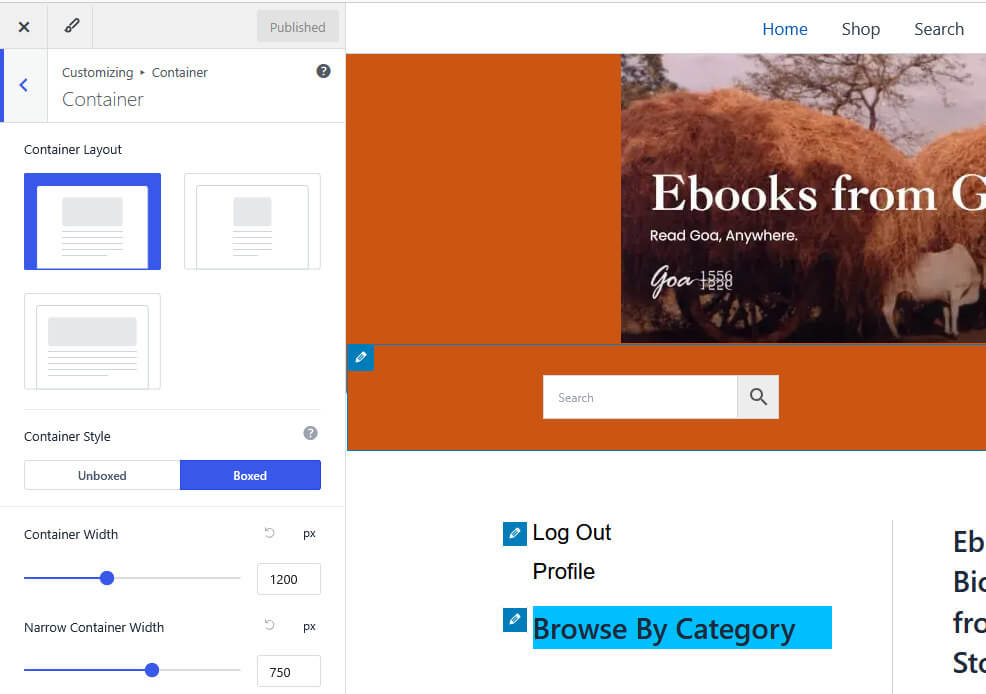
Next, we have the colours step tab. Here we can set the various colours, for links, body text, border links, etc.. Then under container settings, we have the container layout. Select normal container layout with the container style being boxed.
Container style is a fixed width - the container width is 1200 pixels and the narrow container width 750 pixels. Note we can also have container width as 1920, if most of your projected visitors have high resolution screens. In case you are using buttons on your website, you can customise that as well on the button tab.
The Website Header for Astra Theme in WooCommerce
Next we pay attention to the header.
Yeah, we will be shown three headers as the header in Astra is divided into 3 - Above Header, Primary Header and Below Header.
on the Above header, we can have the primary menu. If you click the wheel on the left side of the the Above Header, we can set the height and also make a few design changes. Keep it at 50 pixels because we just have to display the menu. We can also set the background colour, the bottom border colour, bottom border size as well as the padding and margin.
On the Primary Header we set the height 289 pixels for the web design that is used to illustrate this. We set the background colour which we are going to match with the uploaded header background. We can keep the bottom border size as zero and keep the margin Zero. 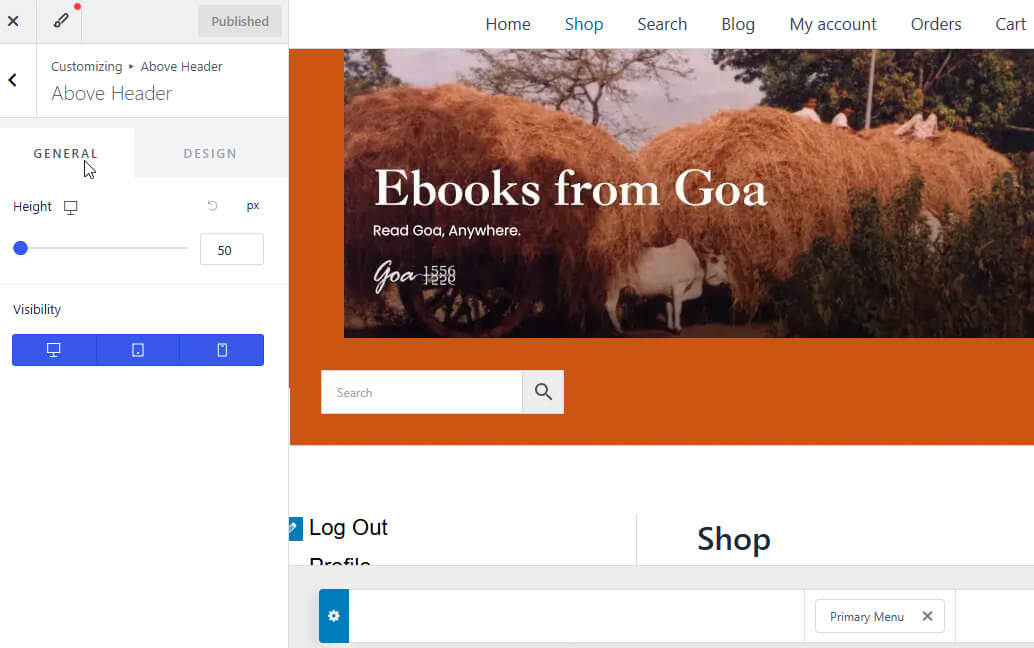
Header Size - Use of Content Width Logo: The header size when you are using a big picture, instead of logo will be 1024 by about 289 or 300 pixels to insert the picture in the header. Select the middle header (Primary header), add widget and in the widget design select image.
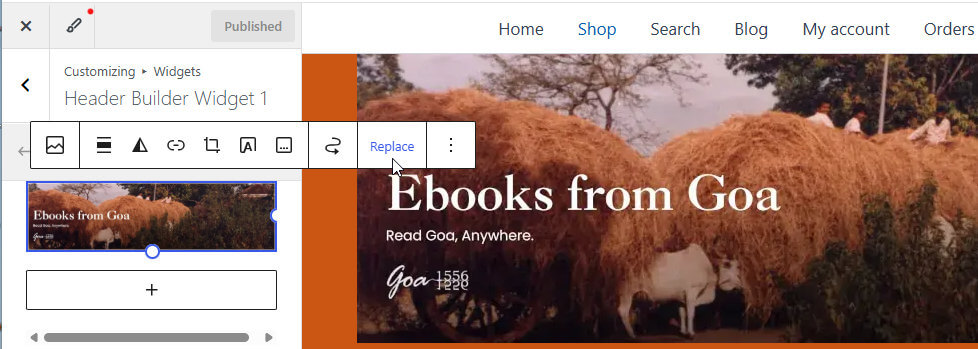
We will add a widget and select the picture that we have prepared for the header to insert there.
Next we customise the below header (bottom most header). We add a widget. We insert the shortcode for Advanced Woo search, This is to implement the search functionality on the store.
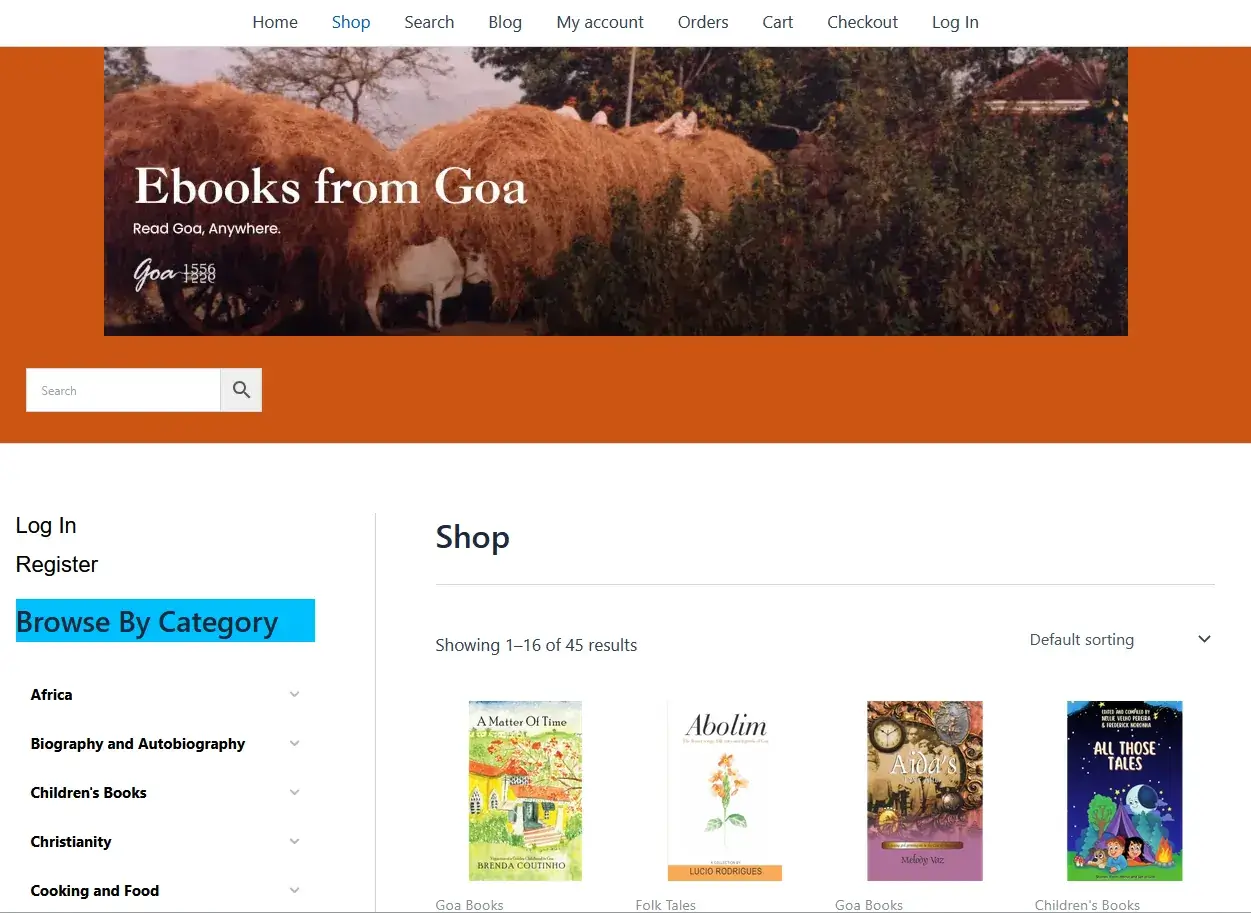
We can make the header with a continuous background without any gaps by using a background graphic. This is implemented using custom CSS code which is set under custom CSS in the template settings. This is how the header looks now.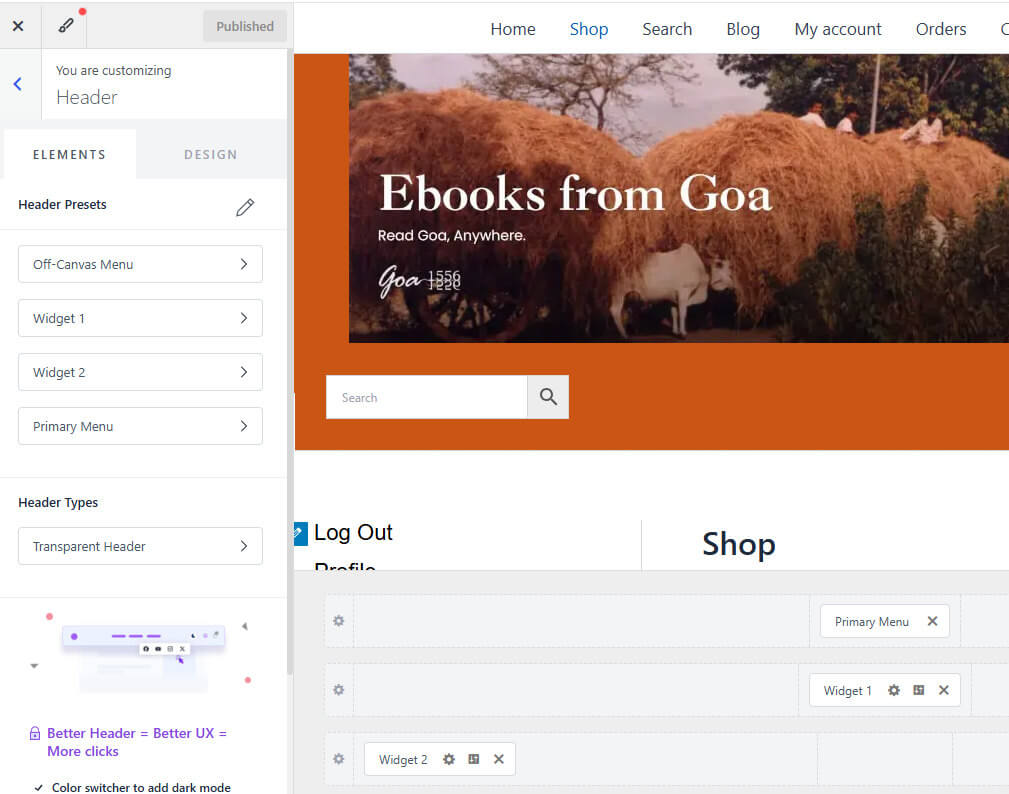
Configuring Settings for Post Types
Next, we have post types where we can have various settings for each type of page and post. We can set the container layout on the left side of the screen. The layout for each type of pages and posts can be set. The settings are available for blog archive, single post single page, search page as well as custom post types.
Under single page for example, we can have the page title area, the container layout, Container style, the sidebar layout, sidebar style, You can have left sidebar, right sidebar, no sidebar, The sidebar style, which we are keeping here in this illustration, is unboxed.
We can have similar settings for different types of pages and different post types. For example, we can customise the page title area, container layout, container style, as well as sidebar layout for a single post also.
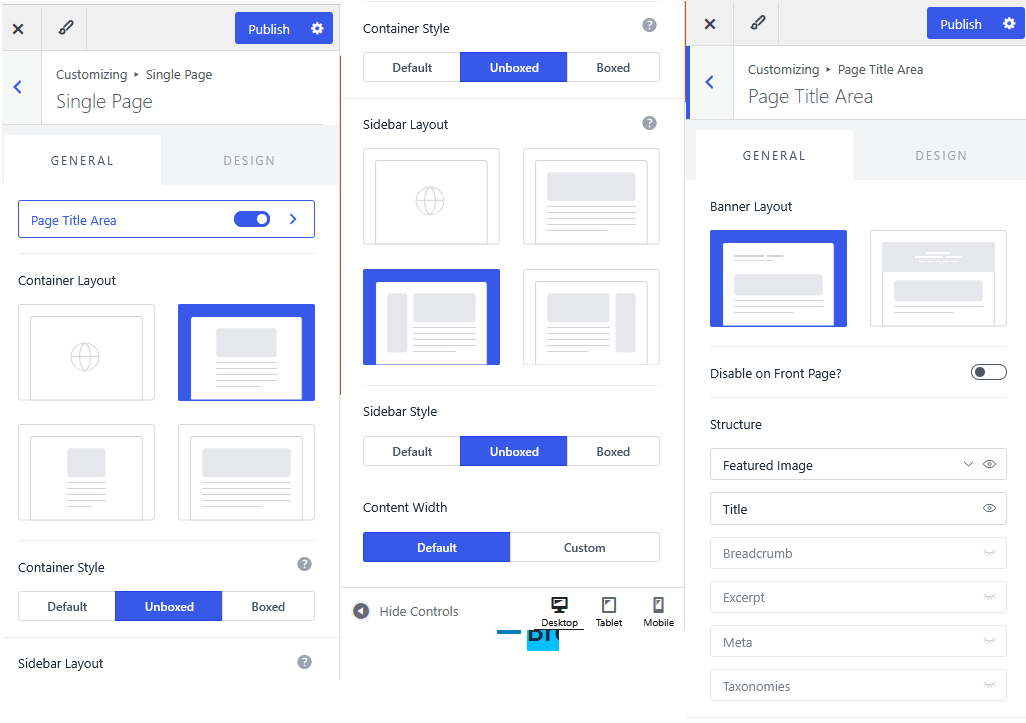
There are various layouts that can be selected for the page title area. The default one is called Banner layout and there is also the second layout as well.
We can also have breadcrumb, Horizontal Alignment, featured image and title which can be optionally enabled or disabled, which can also be displayed in case you want them (from the settings at the page level on the backend).
Under General, we have various settings for breadcrumb, Sidebar, scroll to top, accessibility and block editor.
Under the sidebar, you can set the default layout for the website as a whole and specify the width of the sidebar.
The Website Footer
Next, we can turn our attention to the footer. In the footer, similar to the header, we have three footers namely the Above Footer, Primary Footer and the Below Footer.
The Above Footer we can have a footer menu. Usually we have the following items: Contact us, About us. FAQ, Ordering FAQ, Terms and Conditions and Imprint.
The middle footer, namely the Primary Footer is usually left blank unless we want to enter something like logos for various payment options, etc. The Below Footer displays copyright which will be an extended message like copyright, - your current year and the name of your store along with the address. 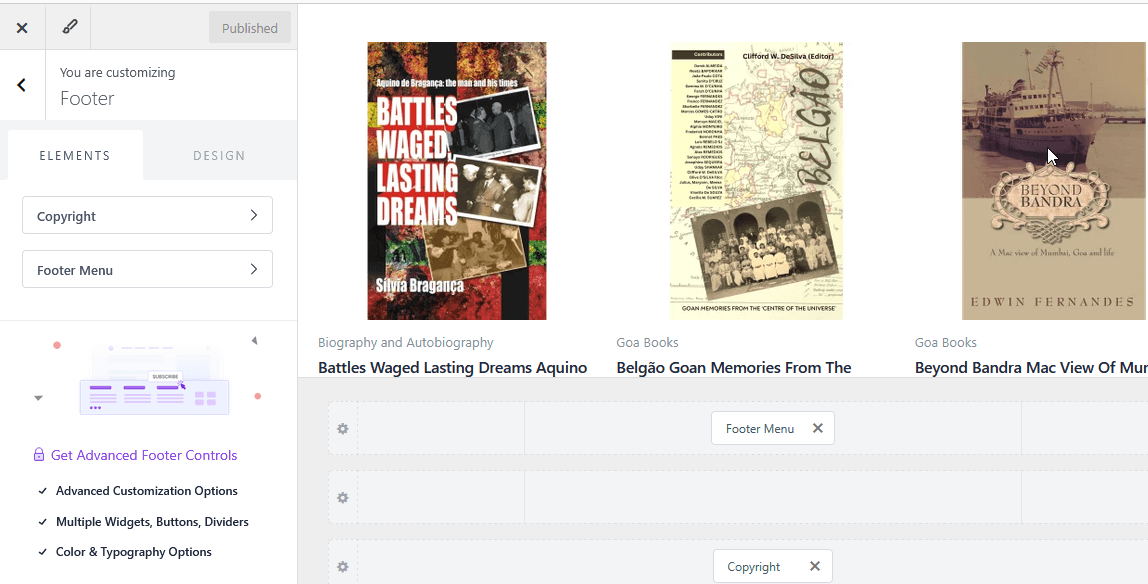
Woocommerce Settings for Astra Theme
Next we have the Woocommerce settings, Under General, we can have the container layout, Container Style, Sidebar layout and sidebar style.
Under the product catalogue. We have the container layout, Sidebar layout, shop layout and the products per page settings.
Next under Single Product. We have the Product Title Area, the Container Layout in the Sidebar Layout .
In the product title area, we can select two types of layouts. The Banner layout which is the default and another alternative layout. Under structure. You have the Title, the meta, Breadcrumb, Excerpt, Featured Image and taxonomies. 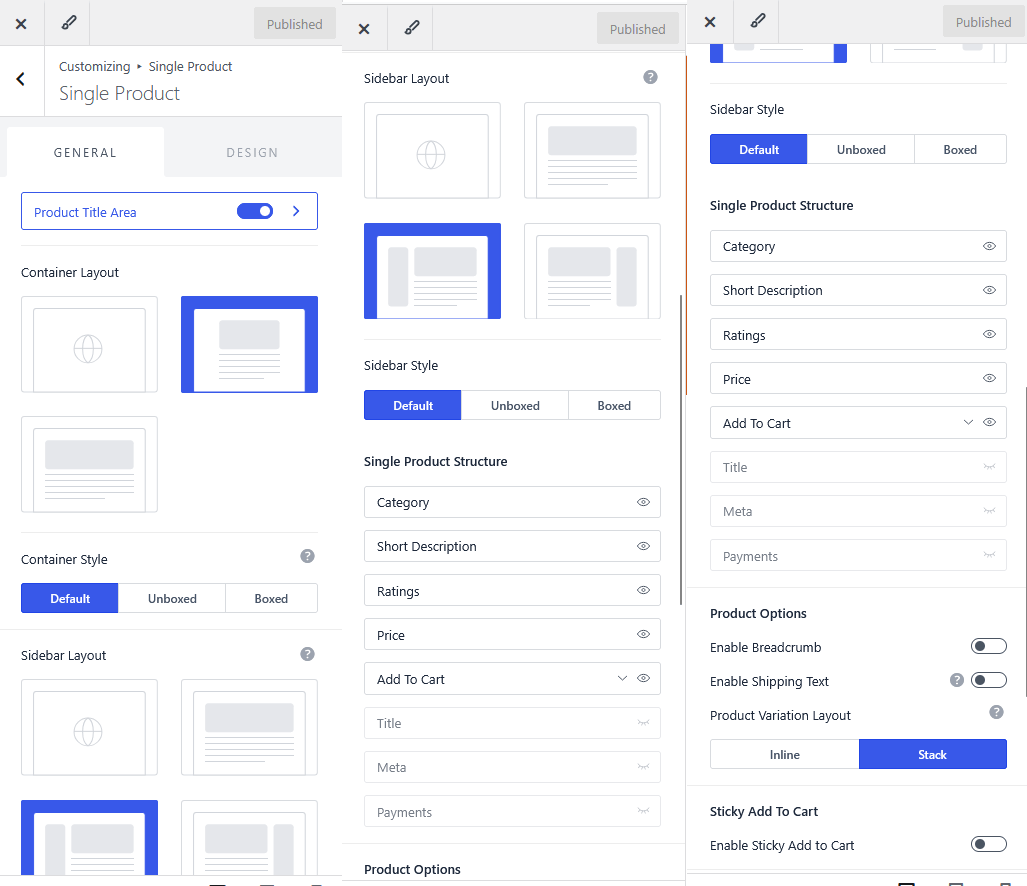
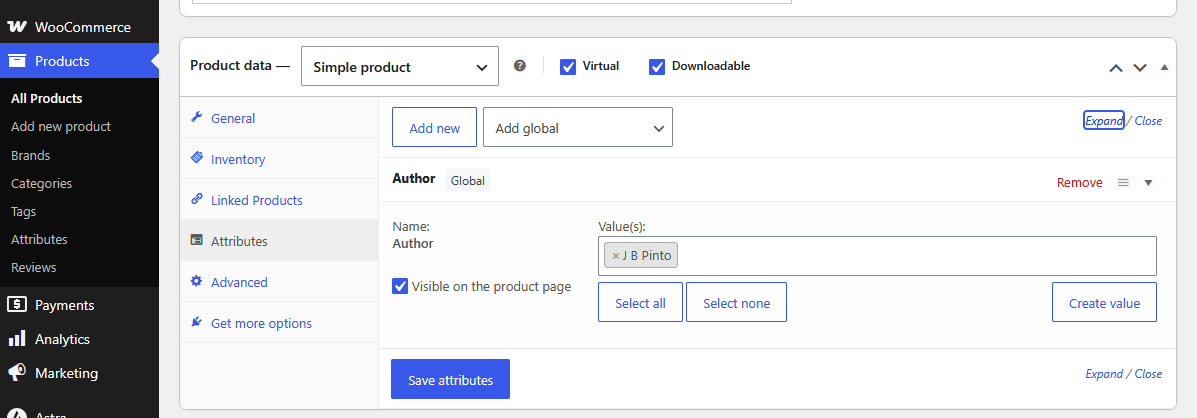
Now, in this bookstore, we wish to display the author of the book and not the person who created the book description and summary, so we have displayed the book order using custom code by entering the book authors under product attributes in the backend. 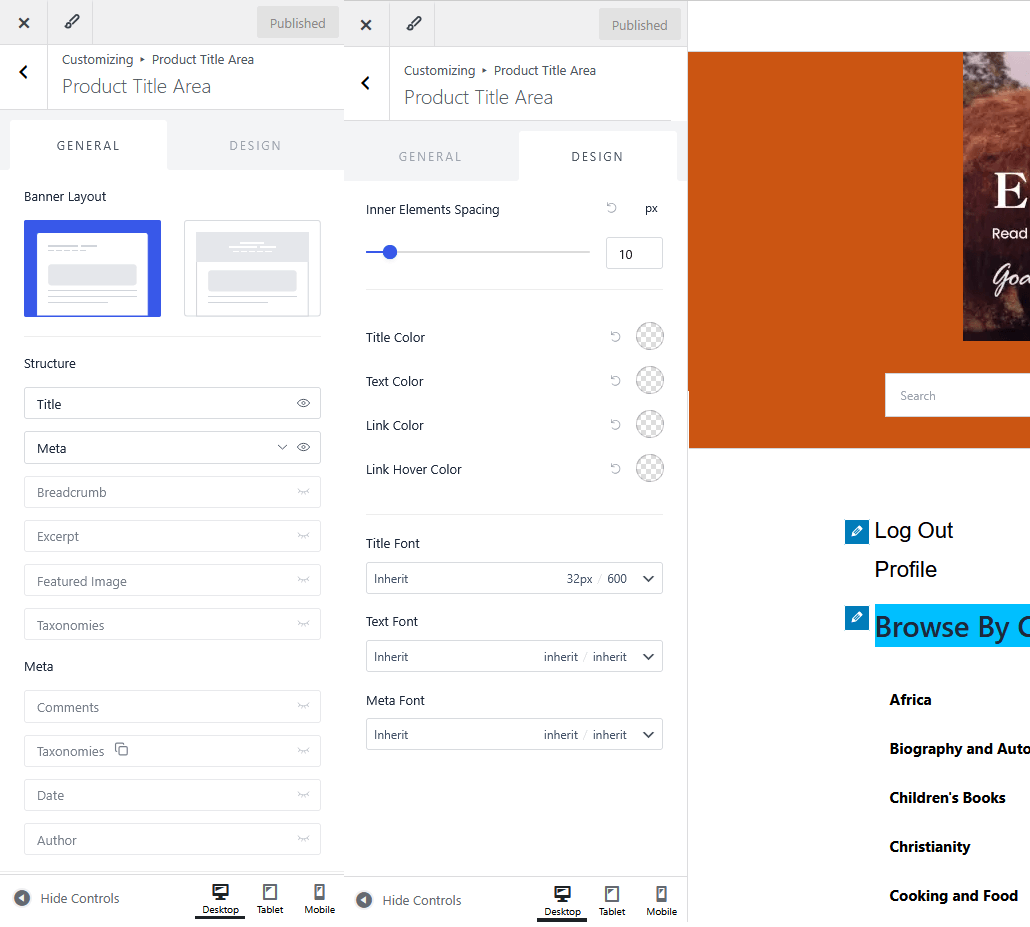
From the backend, the book author is selected on the product page at the back end under the special settings at the bottom of the page.
Yeah, in this bookstore the breadcrumbs, as also the featured image is deactivated because the product image will be used.
WooCommerce Checkout Customisations
We can also customise the cart by a custom Cart Button Text.
The check out page can also be customised by hiding certain fields that are not required. We can also select the Privacy Policy page, the Terms And Conditions page. They are also options which will enable the customer to increase or decrease quantities of the products in the cart. 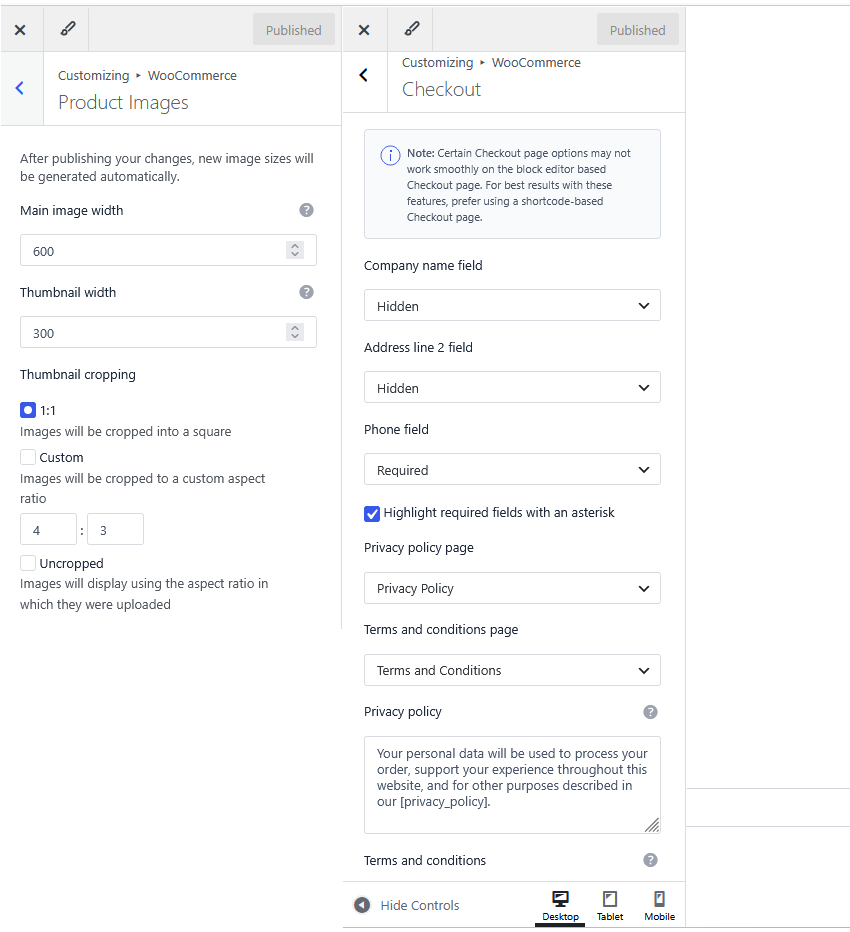
WooCommerce Product Thumbnail Sizes and Menus
We can also adjust the thumbnail and the main image dimensions along with the aspect ratio under Product Images. Under site identity, We can upload a site icon and edit site title and Logo Settings. Menus tab lists all current menus and allows us to modify or create new menus. We can customise the various menus that are available.
Other Settings
The widgets tab gives us easy access to WooCommerce sidebar widgets. The Homepage settings allows us to select the homepage and finally in the additional CSS, we can add custom CSS to control certain displays. For example, as mentioned earlier, we can have the top header without any gaps by having a custom background and specifying the custom background here under CSS. We can also adjust the font of the login logout menu which we can add by using custom widgets in the WooCommerce sidebar.
Creating an Author Attribute
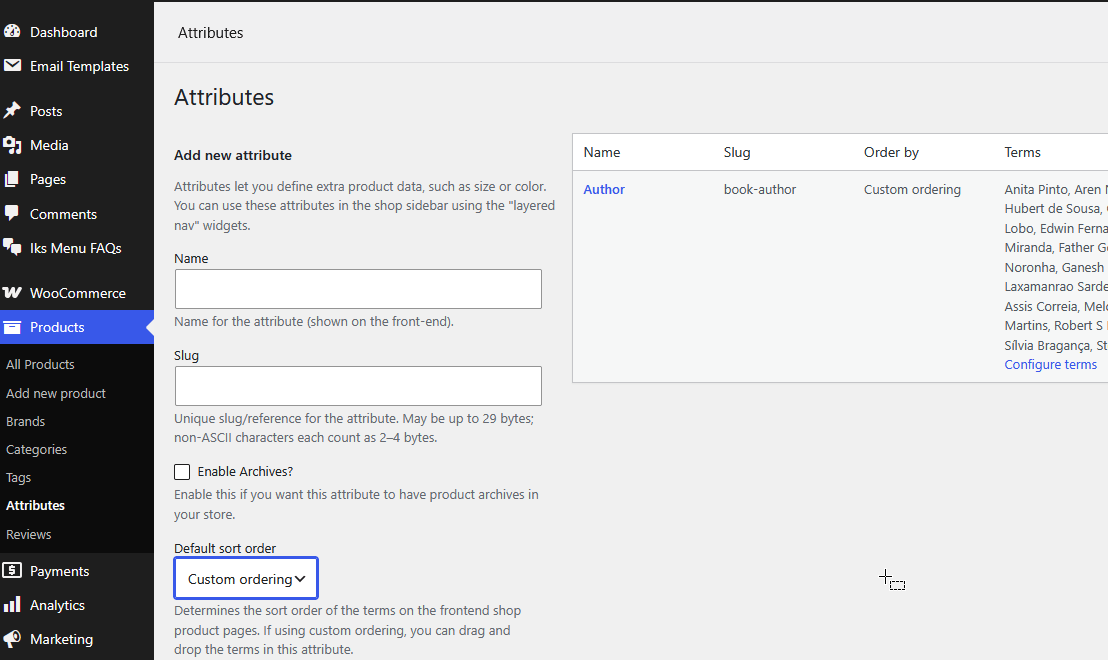
Now, since now, since we are having a bookstore, we are going to use Attributes to create a display for the author of each book for this website. Click on the product tab on the left from the administrator panel, and then we can select Attributes on the left side.
Under Attributes, Add a new attribute and name as author.
We have to create a slug called book-author since we cannot use author as a slug as it is a reserved word. Once this is done, click on attributes on the left of the screen, and once that is displayed, we can go to the extreme right and click on configure terms. Once we click on configured terms, we have the option to add new authors, we can keep adding authors for the various books on our website.
Selecting the Book Author on the Product Page:
Configuring GST , VAT and Other Taxes
Go to your WordPress Dashboard. Click on WooCommerce>> Settings>> General. You need to click on "Enable Tax rates and Calculations" checkbox
Save the setting. You will now see Tax tab in your WooCommerce dashboard.
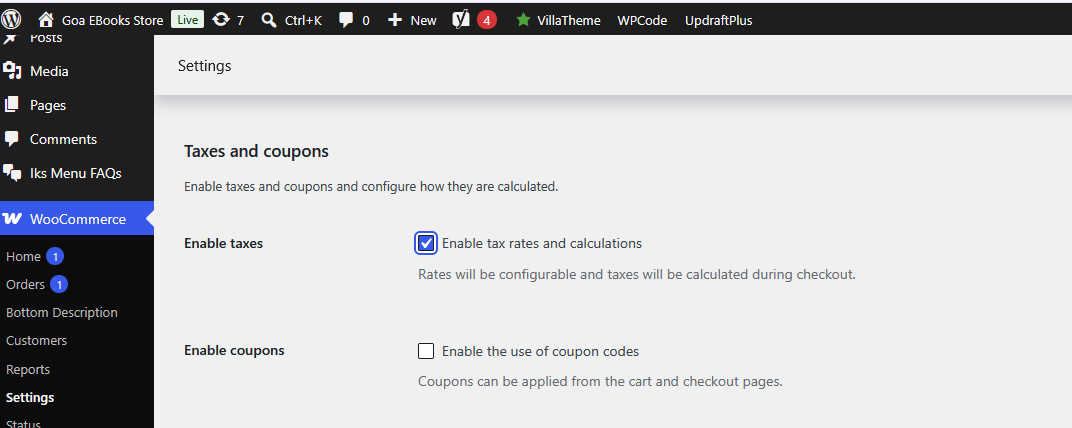
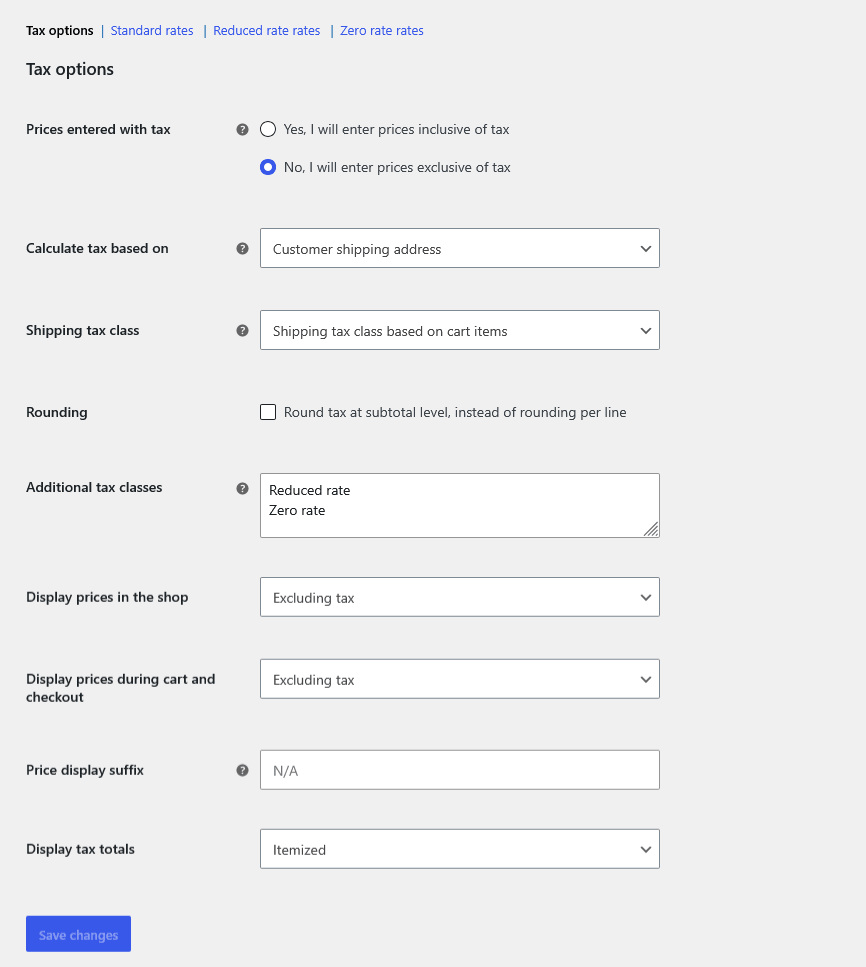
Save the setting. You will now see Tax tab in your WooCommerce dashboard. Navigate to Woocommerce >> Settings>. Tax . Configure these settings :
Prices entered with Tax: Set this to "Yes, I will enter prices inclusive of tax" or "No, I will enter prices exclusive of tax" (This is recommended for GST based businesses as GST is calculated on the base price)
Calculate Tax based on : Use "Customer Shipping address"
Configuring Tax Rates
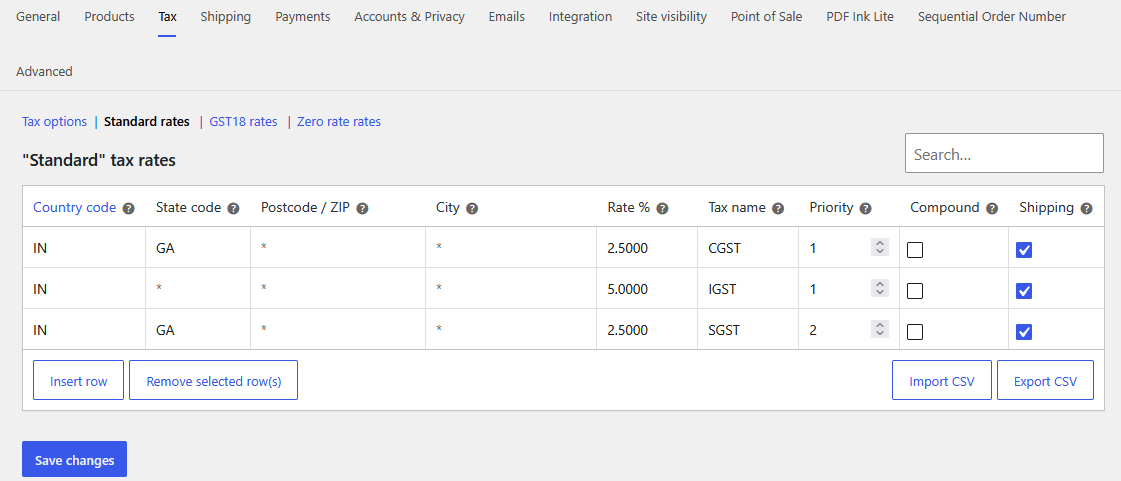
Click on standard rates . Additionally create tax classes for each GST slab your products fall under. For each tax slab you will have 2 entries for intra-state and one for inter-state . Since this is an ebook store there are two rates a 5% rate and an 18% rate and a zero rate for physical printed books.
For the standard 5% GST rate (Intra-state Goa):
Tax name: CGST
Rate:2.5
State Code: 30 (For Goa)
Priority 1
Add another row:
Tax name: SGST
Rate:2.5
State Code: 30 (For Goa)
Priority: 2
For the same Slab IGST 5%
Tax name: IGST
Rate:5
State Code: Leave Blank (For all other states)
Priority: 1
For Each product set the "Tax Class". This can be done by selecting the correct GSt Slab from the product's edit page. You can also add a HSN code by using a product level custom Attribute.
You can install a pdf invoice plugin like PDF Invoices & Packing Slips for WooCommerce and with a bit of code make an invoice like the one below.
I have not entered the logo of the shop. With a bit more customisation, you can also have the GSTIN of the customer entered as well as HSN code of each product.
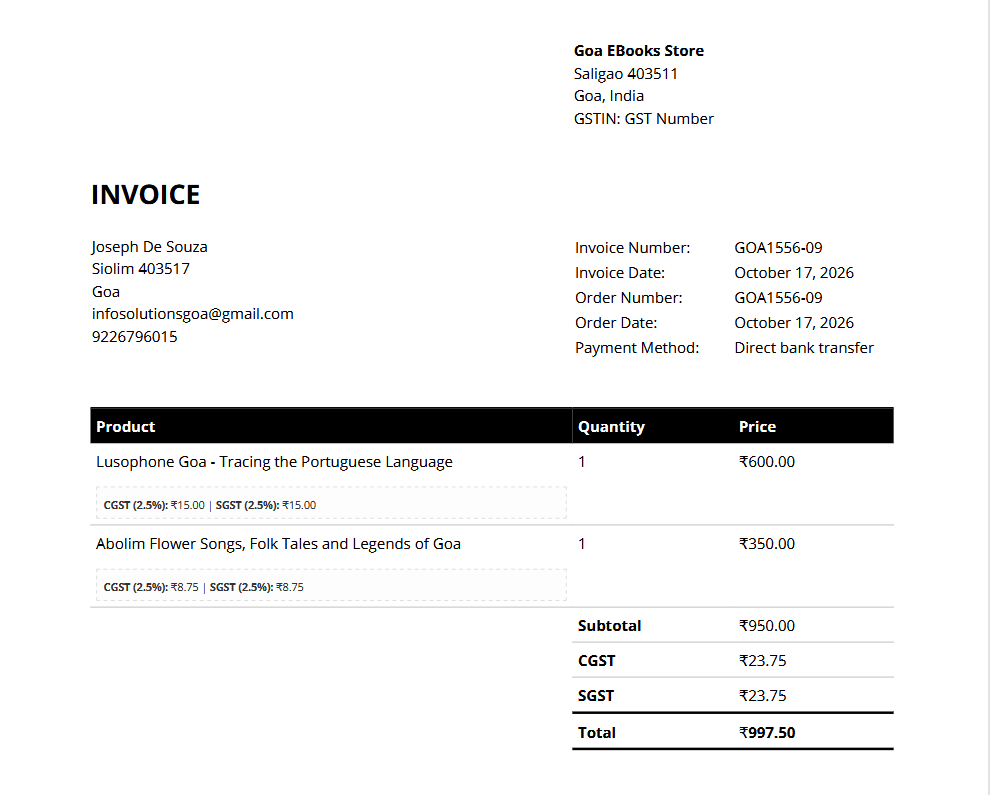
VAT in the EU and several other countries can be configured in a similar way.
Video of Working Of An WordPress and WooCommerce based E-Commerce Website With Downloadable Products
And Finally here is a video to illustrate the working of a WordPress and WooCommerce based ebook website.
About The Author
Joseph de Souza is a leading Freelance SEO consultant and Web developer in Goa, India. He has more than 18 years of experience in Web development, SEO and internet marketing.
He has also worked part-time as an SEO consultant for a German motorcycle tour company based in Cyprus for more than 15 years.
He has managed SEO in both German and English. Joseph has a proven track record of increasing website traffic and helping businesses grow their revenue and profits. He has also successfully optimized a Danish-language e-commerce website and achieved outstanding results.
In addition to English and German, he has experience with SEO for Danish and Portuguese language websites.