Configuring BSNL ADSL Broadband Connection
This is a short tutorial on configuring a BSNL ADSL Broadband connection. These settings have been fully tested in Goa, India and known to be working properly. The configuration consists of two parts – the PC or Laptop side settings and the modem side settings.
Configuring the PC for BSNL ADSL Broadband
The PC settings are the same for all brands of modem and are not dependent on whether a laptop or a desktop computer is used.
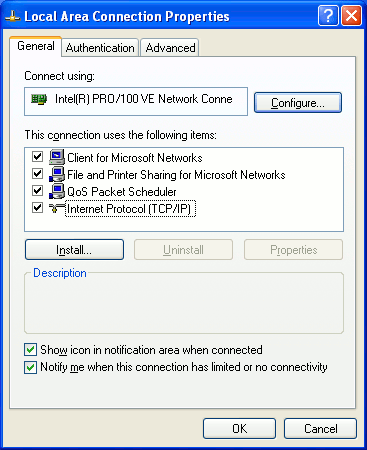
To begin our ADSL broadband configuration process we have to click on the Start button and go the control panel. From there click on Network connections.
Right Click on Local Area Connections and select Properties.
Click on Internet Protocol(TCP/IP) and then click on Properties. The internet protocol TCP/IP properties will be displayed. Here enter the settings as follows
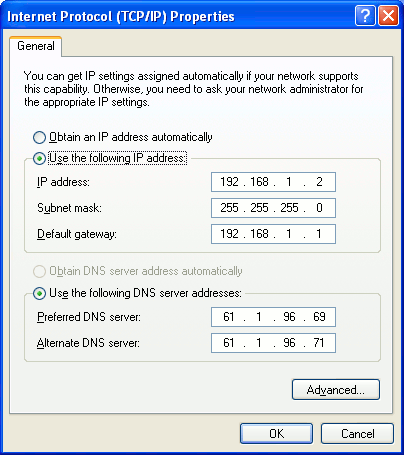
Select Use the following IP address and then enter
IP Address: 192.168.1.x where x can be any number from 2 to 255
Subnet mask: 255.255.255.0
Default Gateway: 192.168.1.1
Preferred DNS Server: 61.1.96.69
Alternate DNS Server: 61.1.96.71
The TCP/IP settings on the PC for the BSNL broadband connection are shown on the screenshot below.
In case of Windows 7 you can keep the default settings on the PC side viz: Obtain an IP address automatically and Obtain DNS Server address automatically
Configuring the Linksys Modem for BSNL Broadband Connection
Start up your favorite browser and type "http://192.168.1.1" on the address bar.
Login using your default username and password which is usually admin and admin.
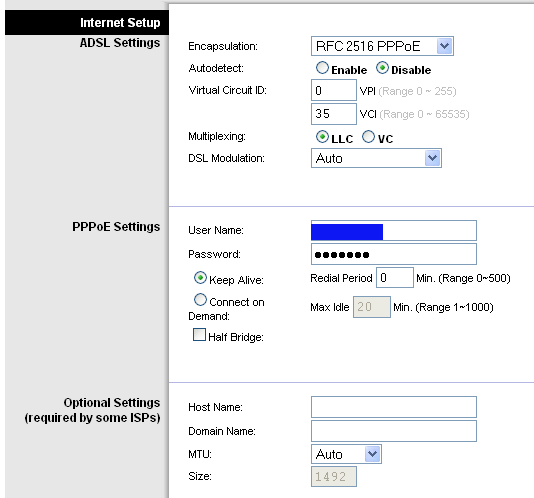
Encapsulation: RFC2516PPPoE
Autodetect: Disable
Virtual Circuit ID: VPI: 0 VCI: 35
Multiplexing: LLC
DSL Modulation: Auto
User Name : <Your BSNL Username>
Password: <Your BSNL Password>
Keep Alive: Redial Period: 0
On the Time zone settings you can also select the appropriate Time zone.
Then click on Save to Save the Settings and Exit.
The settings given above are known to work in Bangalore also as per reports from our site visitors. They are also the default for most parts of India.
UPDATES: Configuring BSNL ADSL Broadband - DNS settings
The DNS settings will be different for each location and will be provided by the local BSNL exchange.
We also have the DNS settings for North Goa.
SIOLIM & Other places in North Goa
Preferred DNS Server:218.248.255.149
Alternate DNS Server:218.248.255.211
Also for those interested the Default Gateway is 117.207.208.1 for North Goa. You can ping this ip to check your connectivity if your web browser does not display any website.